Setting up a customer or partner Community for your organization opens a whole new world of collaboration, connecting partner and customers with your employees. The collaboration can accelerate sales and enable you to provide stellar service to your customers.
Setting up a Community on the Salesforce platform can be pretty easy – provided you know the art of possibility with the product and understand its various out of the box offerings. We recently executed a Community Cloud implementation for a client. Here are some lessons learned on the job.
Strategy
1. Understand the Licensing Model for Communities
There are various license types available for Communities. This is the first and most vital step when you are building your community. Ask yourself following questions before making a decision choice on license:
- How many users will be logging into your Community?
- How often will they be logging in?
- What’s the security model and access around your data?
2. Choose the Right Templates
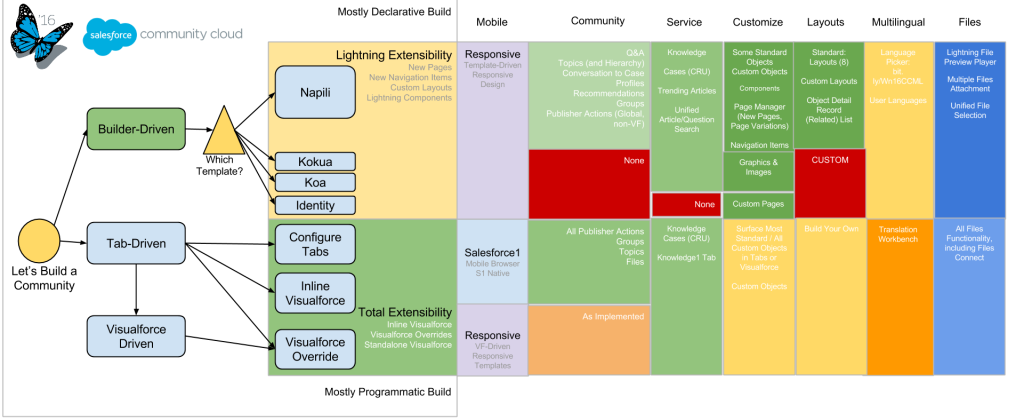
Community Cloud offers three different types of templates (KOA, KOKUA and NAPILI). You also have the ability to build your Communities using Aloha UI using native tabs + Visualforce pages.
Understand each of these options well because they determine your tools and technology. For example, the modern approach of using Napili templates with Community Builder could be a great fit if you are comfortable with the standard look and feel of Napili and are willing to use the new Lightning framework to build components for your Communities.
Here is a diagram from Salesforce to help your decision-making process. Credit to the Salesforce solutions team for putting this together.
Execution
Once you identify the licensing model and templates, it’s time to implement.
1. Identity Out of Box Features That Meet Your Business Requirements
A few of the features that Salesforce provides out of the box include: Knowledge, Ideas, Chatter, Discussions (Chatter answers), Topics, Recommendations, and Private Messaging. Some of these may require a feature license as well. (For example, you need a Knowledge license for a user to author articles inside SFDC). Configure the various roles and profiles needed for your users.
2. Identify Integration Points
If you are an enterprise, you may have multiple systems where your legacy data resides and you may want to mash those with your Communities data or UI. Make a note and try to understand the effort around making integration happen with the templates selected. As an example, for Napili templates you need to build a Lightning Component to integrate with the external source. At this point you won’t be able to use client side JS to make direct callouts – instead you need Apex calls to feed data. For Visualforce templates, you can make callouts using client side JS.
3. Authentication Mechanism
This is key in increasing user adoption and securing your Community. There are various options available with Salesforce Communities. You can configure SSO with your active directory, use social sign on (Facebook, Github, Google Apps, LinkedIn, or any other OpenID provider), or use the built-in Salesforce login screen for user registration and authentication.
4. Identify Custom Components Needed
Not everything can be achieved out of the box, so you might need to build triggers: Apex / Visualforce for Aloha Communities and Lightning Components for templates. Make sure to rigorously test them in your sandbox with appropriate user profiles.
5. Data Uploads
Legacy contacts or other data might need a one-time upload into Salesforce. Use your sandbox to do sample loads and test data quality before loading everything. If data transformation is needed, determine the right tools to transform the data before loading into your Salesforce instance. In one of the Community projects I just finished, we migrated feeds from Zendesk to Salesforce and it was interesting to note the rich text of Salesforce did not support certain characters.
6. Deployment Strategy
The metadata of Communities is a bit different than regular Salesforce deployment. For templates, there is an import and export mechanism to move assets from Sandbox to Production. It goes without saying that having prior experience helps in deployment. The best practice is to maintain the entire metadata on Github or Bitbucket and use the ANT tool to deploy. In the case of Communities, there are still metadata that requires manual loads. (One example is Topics and Topic Assets for the Napili template.)
Adoption
User adoption is extremely important. This will require you to set end user training with appropriate content. Configure reports and dashboards to measure adoption. There are excellent AppExchange from Salesforce Labs to assist you with this endeavor.
In summary, establishing Communities with Salesforce can be accomplished quickly if you have done your homework. At CodeScience, we have the expertise and experience to assist with your Community build – just check out our short video below. We are here to help you succeed. Contact our team today to schedule a time to talk.